Category Archives: cooking

Easter Bunny Bread

Standard
Easter Bunny Bread

Next up from the Holiday section of the cookbook was Easter Bunny Bread.  Just so you know up front, this is not an edible item, purely for show.  Lots of fun to make with your kids though – and he’s kinda cute.  Although mine turned out a little smaller since I had to give up some of my dough so my child could “make her own bunny”.  Happy Easter everyone!

Easter Bunny Bread

The Recipe:

5 1/2 cups all-purpose flour (plus 1/2 cup for flouring the work surface)

2 tablespoons salt

4 1/2 teaspoons sugar

1 tablespoon vegetable shortening

2 cups plus 1 tablespoon water

2 whole cloves (I didn’t have any spare cloves lying around, so I used a couple decorative flower sprinkles)

1 egg

The Process:

1.  Place the 5 1/2 cups of flour, salt, sugar, shortening, and 2 cups of water in a mixing bowl.  Using an electric mixer, mix until incorporated.  I ended up attaching my dough hook to my stand mixer and let it knead it a bit.

2.  Sprinkle your clean work surface with some flour and place the dough on it.  Gently knead the dough until it’s soft and smooth.  Sprinkle with additional flour if it gets too sticky.

3.  Preheat the oven to 400 F.

4.  Cut or pull the dough into 2 equal parts.  Shape 1 of the pieces into a smooth ball and place on a cookie sheet (you can line it with foil if you wish).

5.  Cut or pull the remaining piece of dough into 3 equal parts.  Shape 1 piece into a smooth ball to use as the bunny’s head. Pinch them together to connect the 2 pieces.

6.  Pull off equal pieces of the remaining dough and create a small ball (about the size of a ping pong ball) to use for the bunny’s tail. Pinch to the body to connect.

7.  With the 2 remaining dough pieces, roll them into thick ropes and flatten them slightly so they begin to look like bunny ears.  Place the ears, evenly spaces, on the bunny’s head  and pinch together to attach.  Push a clove (or what ever you have laying around that resembles an eye and can be baked) into each side of the head to make the eyes.

8.  Break the egg into the bowl and add the 1 tablespoon of water.  Beat the egg and water until blended.  Brush the entire bunny with the egg mixture to make him all nice and golden and shiny.

Pro Tip: Mr. Bunny can be sprayed with lacquer to make him last longer.

Teddy Bear Pancakes

Standard

My little girl is home sick today, so we were flipping through the cookbook, and her little eyes widened as we turned to the teddy bear pancakes.  How could I say no to that sweet face?  Plus, pancakes on a weekday, so bonus 🙂  All in all, I have to say this is a great recipe to have in my back pocket.  Very little sugar, whole wheat flour (which is immensely surprising for a cookbook written in the ’80’s…)  Hope your kids (big and small) enjoy as much as mind did!

Teddy Bear pancakes

The Recipe (made about 8 good size bears):

4 tablespoons butter

1/2 cup all-purpose flour

1/2 cup whole wheat flour

1 1/2 teaspoons baking powder

1/2 teaspoon sugar

1/4 teaspoon salt

1/4 teaspoon cinnamon (my addition)

1 egg

1 cup milk

Honey (optional)

Banana slices (optional)


The Process:

1.  Heat griddle (or frying pan) to medium heat.

2.  Melt 2 tablespoons of the butter and set aside.

3.  Place the all-purpose flour, wheat flour, baking powder, sugar and salt in a bowl.  Stir to combine.

4.  Break the egg into the bowl.  Add the melted butter and milk and whisk until incorporated (shouldn’t be any lumps).

5.  Brush the griddle or frying pan with butter to coat evenly.

6.  To make the Teddy shapes, spoon about 1 tablespoon of batter into the center of the pan for the body and then 1 teaspoon above for the head.  With another teaspoon, make the 2 ears, 2 hands, and 2 feet.

7.  Cook over medium heat until small bubbles begin to form on the top.  When golden brown on the one side, flip over and allow the other side to cook, about 2 more minutes.

8.  Repeat till all the batter is gone!

Pro Tip:  Heat the oven to low heat (200 F) and place the finished pancakes on a cookie sheet with a foil cover to keep warm until you’re ready to serve.

Serving Suggestion:  I’m typically pretty boring when it comes to pancakes – maple syrup is enough for me.  However, they recommended honey as a topping, and I thought – what the heck?  So I sliced some bananas, drizzled a little honey over, finished with a dusting of powdered sugar – and holy pancake!  My kid could not eat them fast enough.  Mommy mission “Feel Better” accomplished.


Cheater Chili

Standard
Cheater Chili

We’re not huge chili eaters around here.  So I wasn’t super excited when I came across the recipe in the book.  But then, I had a moment of inspiration…what if I used the left over Mini-Meatloafs as the base?  That would save me some cooking time, and use left overs that always get forgotten in the depths of the fridge.  Genius? Maybe, maybe not.  But hey, we ate chili, and it was pretty darn tasty 🙂

Chili

The Recipe (makes 6 servings):

1 medium bell pepper (any color will do)

1 small onion

1 pound lean ground beef (or left over Mini-Meatloafs!)

1 can (14 1/2 oz.) crushed tomatoes

1 can (19 oz.) kidney beans (I actually left these out of my chili)

2 tablespoons chili powder

1 tablespoon ground cumin (Cumin and I do not get along, I can’t stand the smell, so omitted this too!) 🙂

1/2 teaspoon garlic powder

1 cup tomato puree

1/2 teaspoon salt

4 oz. Sharp Cheddar, grated

1 container sour cream

Green onions for garnish, optional


The Process:

1.  Chop the bell peppers and onions.  Saute in a sauce pan until tender.

2.  Add the ground beef (or Mini Meatloafs!) to the pan and cook over medium heat until no pink remains.

3.  Empty the can of crushed tomatoes into the pan and stir.

4.  Strain and rinse the kidney beans and add to pan.

5.  Add the chili powder, cumin (yuck), garlic powder, tomato puree and salt to the meat mixture.  Simmer over low heat for 20 minutes, stirring occasionally.

6.  While the chili is cooking, shred the cheddar (don’t scrape your knuckles!).

7.  When the chili is ready, ladle into bowls and top with grated cheddar, a dollop of sour cream, and green onions if you choose.

It may be cheating, but cheating can be yummy 🙂

Banana (Chocolate) Walnut Bread

Standard

I think everyone should bake a loaf of this bread right now, just so your house smells as good as mine! 🙂 Great texture and flavor – I have to say, I’m really sorry I’ve never tried all these yummy recipes before!  So far, they have all been amazingly good.  I did add some chocolate chips to my version, because, why not?!?

na Chocolate Walnut Bread

The Recipe (makes 1 loaf):

1/2 cup (1 stick) butter, at room temperature

2 cups all-purpose flour

3/4 teaspoon baking soda

1/2 teaspoon salt

3/4 cup sugar

2 eggs

3 very ripe bananas

2 tablespoons sour cream

1 cup chopped walnuts

1/2 cup chocolate chips (optional)

Cinnamon Cream Cheese for serving (recipe follows)

The Process:

1.  Preheat the oven to 350 F.

2.  Grease the bottom and sides of a 4×8 loaf pan with butter.

3.  Mix the flour, baking soda, and salt in a bowl.

4.  Place the butter and sugar in your mixing bowl and beat with mixer until light and fluffy.

5.  Break the eggs into the bowl and beat until completely blended with butter mixture.

6.  Add the flour mixture and beat until smooth.

7.  Peel the bananas and break into small chunks.  Add the bananas, sour cream, walnuts, and chocolate chips.  Blend at low speed until combined.

8.  Pour the batter into the buttered loaf pan and smooth out the top with a rubber spatula.

9.  Bake for 1 hour 10 minutes (I found this was spot on).

10.  Remove from oven and let cool for 15 minutes (yeah right).  Turn the pan upside down to allow the loaf to fall out.  Place loaf right side up and let cool another 15 minutes (sure…) before slicing.

This bread was great on its own, but even better with some Cinnamon Cream Cheese.

Cinnamon Cream Cheese

I package softened cream cheese

1 teaspoon cinnamon (or more to taste)

2-3 teaspoons brown sugar

Classic Fudge Brownies (with a Peanut Butter twist)

Standard

Here’s your pretty standard fudgy brownie recipe.  I added a little “me” twist by swirling in some yummy peanut butter – just to make them that much more awesome.

Fudge peanut butter Brownie


The Recipe

4 oz. unsweetened baking chocolate (I used semi-sweet chocolate chips since I had them on hand)

1/2 cup (1 stick) butter

1 1/2 teaspoons butter at room temperature

3 eggs

1  1/2 cup sugar

1 teaspoon vanilla (as per usual, I did 2 teaspoons)

1 cup all-purpose flour

1/4 cup melted peanut butter (optional)

1 cup chopped walnuts (optional)


The Process

1.  Preheat oven to 325 F

2.  Using a double boiler, melt the 1/2 cup butter and chocolate over low heat.  Stir occasionally.  Set aside to cool when completely melted.

3.  Butter the bottom and sides of a 9×12 baking dish.

4.  Break the eggs into the bowl of your mixer.  Add the sugar and vanilla and beat until light and fluffy (around 2 minutes).

5.  Add the cooled chocolate mixture and mix at low speed until incorporated into the sugar mixture.   Add half the flour and mix at low speed until mixed in.  Add the remaining flour (and optional walnuts) and mix until blended.

6.  Pour the batter into the buttered baking dish.  If using the peanut butter option, melt 1/4 cup of peanut butter in the microwave.  Place a dollop of peanut butter at each corner of the pan and 1 dollop in the center.   Using a knife, swirl the peanut butter in an “S” shape from top to bottom, and then side to side.  The tops of these brownies turn out a little light, so the pretty peanut butter swirls got a little lost unfortunately.  But they still tasted amazing!

7.  Place in oven and bake for approximately 25-30 minutes.

8.  If you can…allow the brownies to cool for 15 minutes before diving in.

Choco-holics unite! 

Mini Meatloaf (aka Meat Muffin, aka Meat Cupcake)

Standard
Mini Meatloaf (aka Meat Muffin, aka Meat Cupcake)

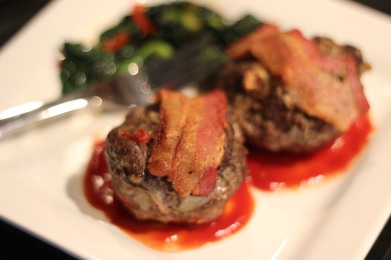
Call it what you will, but let’s be honest – it’s a meatball. 🙂  But a darn good meatball!  I followed the recipe almost to a “T”, and it turned out amazing.  The only suggestion I didn’t take was to turn the “meat muffin” upside down when serving so the bacon is on the bottom.  Who in their right mind would hide bacon?!?

*Pro Tip: Place your muffin tin in a dish with higher sides to catch the drippings.  I’ll be cleaning my oven if anyone needs me…sigh…

Personal Mini Meatloaf

The Recipe

2 Tablespoons butter (or cooking spray)

1 medium onion

1 1/2 pounds ground beef

1/4 cup bread crumbs (I used Italian seasoned)

1/2 Teaspoon garlic powder

1/2 Teaspoon salt

1/4 Teaspoon pepper

1 egg

Ketchup

3 slices of bacon, cut into thirds

The Process

1. Preheat oven to 350 F

2.  Lightly butter a muffin tin (or spray lightly with cooking spray)

3.  Finely chop onion.

4.  Place meat in large working bowl.  Add in chopped onion, bread crumbs, garlic powder, salt and pepper.  Break egg into bowl and mix all ingredients by hand until incorporated.

5.  Spoon 1 tablespoon of ketchup into each muffin tin (The recipe calls for 6 meat muffins, I ended up with 7).

6.  Divide the meat mixture evenly into muffin cups (the book kindly reminds us to wash our hands after this step, so don’t forget!)

7.  Place 1 strip of the cut bacon over each meatloaf.

8.  Place the muffin tin on your preferred baking dish (to catch drippings – don’t be like me!!)

9.  Bake at 350 F for 25 minutes.

10.  Remove from oven and serve bacon side up (don’t listen to them and hide the bacon!) Serve alongside your favorite veggies (we had some kale hanging around that was dying to be sauteed).

Mmmm….soft pretzels….

Standard

Who on this planet doesn’t love a good soft pretzel?  Especially a home-made one, fresh out of the oven?!? Now I’m hungry…but I’ll press on.  I made these Rosemary Sea Salt Pretzels a few months ago, and they were A-mazing.  So I thought I’d share the recipe.  Did I mention they also include the recipe for an awesome rosemary cheese sauce?  Oh yeah, no joke.

rosemary sea salt pretzel

And then today, I came across these and I just had to pass it along – Chocolate Chip Brioche Pretzels.  Sweet meets pretzel = my heaven!   Guess I know what I’m baking this weekend…

Rosemary Roasted Chicken

Standard

This was my first official whole roasted chicken ever!  I’ve cooked a turkey once, maybe twice in my life, but that’s about it.  And truthfully, I’m sold.  Home-cooked chicken breasts are always so dry and tasteless it seems.  This chicken was perfectly juicy and moist (and we had enough left over to make an awesome Thai coconut soup the next day!)  I took some liberties with this recipe though.  For one, no one in my house will eat a tomato – roasted or not.  So, I omitted those and chose to stuff the chicken with lemon wedges instead.  And I changed my cooking time/temperature based on good friend’s suggestion – so glad I did.

y Lemon Roasted Chicken

The Recipe:

1 (5.5-6 lb whole roasting chicken), giblets removed

1 tablespoon salt (sounds like a lot, but it really needs to soak into all the meat)

1/2 teaspoon pepper

2 tablespoons fresh rosemary, finely chopped – plus whole sprigs for the cavity

1 lemon, cut into wedges

4 tablespoons butter, room temperature

The Process:

*Pre-heat oven to 425 F

1.  Remove chicken from packaging and remove giblets.  Rinse under cold water and pat dry.

2.  Stuff cavity with lemon wedges and several rosemary sprigs.

3.  Blend butter, chopped rosemary, salt and pepper in a bowl.  Rub compound butter onto (and under) chicken skin.

4.  Tie legs together (don’t make my silly mistake first and not but the breast side up before doing this!) with kitchen string and tuck wings under.

5.  Place chicken in roasting pan.

6.  Bake for 1 hour 30 minutes at 425 F.   Breast should reach an internal temperature of 165 F.


Any one else have some good tips for a newbie chicken roaster like myself?

Tiramisu Cupcakes

Standard

Recipe adapted from here

Like I said, I made these for my husband’s birthday last month and they were a huge hit.  I personally wasn’t a fan of the cake (too dense I felt), so here’s my adaptation using the cake from the Beehive Lemon Cupcakes.

Great for breakfast too – I mean, they do have coffee… 😉

Tiramisu cupcake

The Recipe (makes 24 cupcakes):

2-1/2 cups flour

1 tablespoon cornstarch

1 tablespoon baking powder

1/2 teaspoon cinnamon

1/2 cup (1 stick) butter at room temperature

1-1/2 cups sugar

4 eggs

1 cup milk

2 teaspoons vanilla

Zest of a lemon

3/4 cup mini chocolate chips (I added closer to 1 cup)

Coffee syrup (recipe follows)

Mascarpone/Ricotta Frosting (recipe follows)

The Process:

1.  Preheat oven to 375 F (I’ve found with my picky oven that I do better with 350 F)

2.  Put paper cupcake liners into muffin cups.

3.  Place flour, cornstarch, baking powder, and nutmeg in a bowl and mix together.

4.  Place the butter and sugar in the bowl of your mixer and beat on medium-high speed, until the mixture is light and fluffy (about 3 to 4 minutes). Scrape sides as necessary.

5.  Beat in eggs, 1 at a time, until thoroughly incorporated.  Add in vanilla and lemon zest.

6.  Add half the flour mixture and mix until blended.  Add half the milk.  Mix in the remaining flour mixture and then the remaining milk.

7.  Add the chocolate chips and mix at the lowest speed (I honestly prefer to mix things like this in by hand so I don’t over-mix my batter)

8.  Using a small ladle or scoop, spoon the batter evenly into the paper lined muffin cups.

9.  Bake for about 15 minutes until the tops are golden brown (I found with these cakes, that 13 minutes was perfect, so I say experiment with your oven)

10.  Remove cupcakes from tin and place on cooling rack.  Allow to cool completely.

11.  Using a fork, poke several holes in the tops of the cooled cakes.  Spoon over about 1-2 tablespoons of the Coffee Syrup on the top of each cupcake.  Pipe on Mascarpone Frosting and garnish with either cocoa powder and/or extra mini-chocolate chips.

Coffee Syrup

1 cup strongly brewed coffee
1-2 tablespoons powdered sugar
Add powdered sugar to coffee, mix to dissolve.  Cool to room temperature.

Mascarpone-Ricotta Frosting

1 cup heavy cream
Mascarpone cheese, 8 oz. container
1/4 cup Ricotta cheese, strained slightly
1/2 cup powdered sugar
2 teaspoons vanilla
1-2 tablespoons milk

Whip heavy cream until stiff peaks form.  In a separate bowl, whip the cheeses, powdered sugar, vanilla and milk until thoroughly incorporated.  Gently fold in whipped heavy cream.  Pipe frosting onto cupcakes with star tip.  Dust with cocoa powder and extra mini chocolate chips.

Beehive Lemon-Chocolate Cupcakes with Cream Cheese Frosting

Standard
Beehive Lemon-Chocolate Cupcakes with Cream Cheese Frosting

I’ll admit it – cupcakes and I have a love-hate relationship.  Or maybe it’s my oven and cupcakes have a love-hate relationship.  Either way, it’s taken me forever to get the proper time to temperature ratio.  But, by George, I think I’ve got it!  I loved the brightness of the lemon (if that’s even a culinary expression, if not – I call dibbs!) paired with the bitterness of the semi-sweet chocolate in these cupcakes.  And the icing was light and not overly sweet – the perfect combination in my opinion!

I have an awesome recipe for Tiramisu cupcakes that I made for my husband’s birthday last month, and honestly I wish I had used this recipe for the cake – would have been the perfect pairing.  I’ll post that next 🙂

Beehive Lemon Cupcakes with cream cheese frosting

The Recipe (makes 24 cupcakes):

2-1/2 cups flour

1 tablespoon cornstarch

1 tablespoon baking powder

1/4 teaspoon nutmeg (the original recipe calls for cloves, but that sounded way to harsh of a flavor in my opinion)

1/2 cup (1 stick) butter at room temperature

1-1/2 cups sugar

4 eggs

1 cup milk

2 teaspoons vanilla (my addition, because what’s a cupcake without vanilla!)

Zest of a lemon (my addition as well, but I felt like I needed to incorporate some of the lemon flavor from the frosting)

3/4 cup mini chocolate chips (I added closer to 1 cup)

Beehive frosting

Chocolate sprinkles for garnish

The Process:

1.  Preheat oven to 375 F (I’ve found with my picky oven that I do better with 350 F)

2.  Put paper cupcake liners into muffin cups.

3.  Place flour, cornstarch, baking powder, and nutmeg in a bowl and mix together.

4.  Place the butter and sugar in the bowl of your mixer and beat on medium-high speed, until the mixture is light and fluffy (about 3 to 4 minutes). Scrape sides as necessary.

5.  Beat in eggs, 1 at a time, until thoroughly incorporated.  Add in vanilla and lemon zest.

6.  Add half the flour mixture and mix until blended.  Add half the milk.  Mix in the remaining flour mixture and then the remaining milk.

7.  Add the chocolate chips and mix at the lowest speed (I honestly prefer to mix things like this in by hand so I don’t over-mix my batter)

8.  Using a small ladle or scoop, spoon the batter evenly into the paper lined muffin cups.

9.  Bake for about 15 minutes until the tops are golden brown (I found with these cakes, that 13 minutes was perfect, so I say experiment!)

10.  Remove cupcakes from tin and place on cooling rack.  Allow to cool completely before frosting.

Beehive Frosting

The Recipe:

2 cups confectioners’ sugar

1 cup (2 sticks) butter, at room temperature

2/3 cup (about 6 ounces) cream cheese, at room temperature

1 teaspoon lemon juice

1 teaspoon vanilla (my addition again…I have a thing for vanilla apparently…)

2 tablespoons milk

2 drops yellow food coloring (I ended up using 4)

The Process:

1.  Cream the butter, confectioners’ sugar, and cream cheese in your mixing bowl at medium speed.

2.  Add the lemon juice and vanilla, and beat for 1 minute, cleaning sides as needed.

3.  Add the milk and the yellow food coloring and beat until completely blended, about 1 minute more.

I ended up using a star piping tip to make my “beehives”, simply trying to mound up the frosting (as they recommended), didn’t seem to look right.

Hope you enjoy!