Tag Archives: cooking

Honey Lemon Bars

Standard
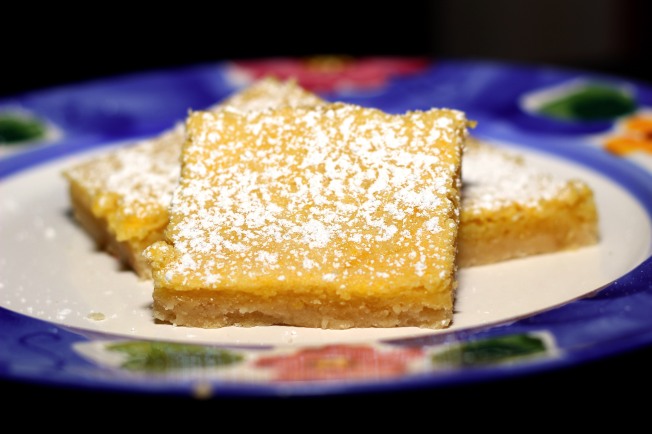
Honey Lemon Bars

I’m a huge fan of anything lemon when it comes to baking.  These are amazing, and super simple to put together.  The honey adds just the right amount of sweetness without being overpowering.  A perfectly light, warm-weather dessert 🙂

honey lemon bars


The Recipe:

Dough:

1 cup all-purpose flour

2 tablespoons sugar

1/2 cup (1 stick) butter, cold

Filling:

2 large eggs

1/4 cup honey

3 tablespoons lemon juice

1 teaspoon lemon zest (my addition, but a little more lemon flavor never hurts in my opinion!!)

2 tablespoons flour

1/2 teaspoon baking powder

The Process:

1.  Heat oven to 350 F (325 F if using glass or dark metal pans)

2.  To make the dough, place the flour and the sugar in a mixing bowl and stir to combine.

3.  Cut the cold butter into small chunks and add to the flour mixture.  Using your hands, rub the butter into the flour mixture until all the butter disappears and the dough starts to hold together a bit.

4.  Place the dough in an 8″x8″ baking pan and press into the bottom in an even layer.

5.  Place in oven for approximately 10-12 minutes to bake.

6.  While the crust is baking, prepare the filling.  Break the eggs into a mixing bowl and add the honey and lemon juice.  Whisk together until completely blended.  Add the flour and baking powder and whisk again until smooth.

7.  Remove crust from the oven and pour the lemon filling into the pan.

8.  Bake for 20-25 minutes.  The filling should not move when you slightly shake the pan.  If it does, place back in the oven for another 5 minutes.

9.  Transfer to a cooling rack and allow 10 minutes for cooling before cutting into squares.  Sprinkle with powdered sugar and enjoy the lemony goodness!

Apple Almond Tea Cake

Standard
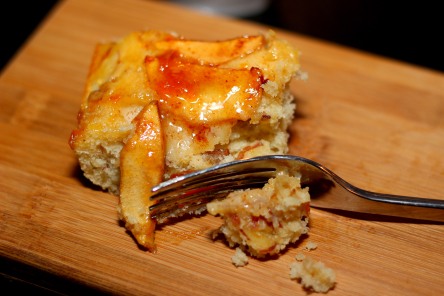
Apple Almond Tea Cake

I couldn’t wait to get cracking in the kitchen after receiving the new book (My First Baking Book).  So here’s the first round…Apple Almond Tea Cake.  Super good.  Nice dense cake with just a touch of sweetness.  Love the flavor (and slight crunch) from the sliced almonds in the cake, and the apples on top pair perfectly of course.  Top it all off with an apricot glaze, and you have the perfect brunch (or breakfast…or dessert…) snack!

apple almond tea cake

The Recipe:

1/2 cup (1 stick) butter, at room temperature (plus extra for buttering the pan)

2 cups all-purpose flour

1 1/2 teaspoons baking powder

1/2 teaspoon nutmeg

1/2 cup granulated sugar

2 large eggs

1 cup milk

1 cup sliced almonds

2 medium apples

1/2 tablespoon brown sugar

1/2 teaspoon cinnamon

Glaze:

3 tablespoons apricot jam

1 tablespoon water

The Process:

1.  Preheat the oven to 350 F (325 F if using a glass or dark pan).

2.  Grease the bottom and sides of a 9×13 baking pan.

3.  Put the flour, baking powder and nutmeg in a bowl and stir to combine.

4.  Place the 1/2 cup of butter and the granulated sugar in the mixing bowl and beat at medium speed until light and fluffy (around 4 minutes).

5.  Break the eggs into the bowl and beat again until blended.

6.  Add the flour mixture and mix at low speed until smooth.

7.  Pour in the milk and mix again.

8.  Stir the sliced almonds into the batter until combined.

9.  Pour the batter into the greased 9×13 baking pan and spread evenly.

10.  Peel and core the apples.  Cut in half and then cut the halves into thin, even slices.

11.  Here’s where I took a detour from the original recipe…I placed the apple slices in a bowl and tossed them with a squeeze of lemon, the brown sugar and cinnamon.  The original recipe has you place the apples on top of the batter and then sprinkle the sugar/cinnamon mixture over.  I wanted a more “even” coating, but you can choose your method 🙂

12.  Place the apple slices in 3 long lines, overlapping, on top of the batter down the length of the pan (makes for easier cutting this way).

IMG_3025

13.  Place in oven and bake until the cake pulls away slightly from the sides of the pan and a cake tester comes out clean, approximately 50 minutes (Again, with my oven it was close to 35 minutes, so I would check yours frequently after 35).

14.  Remove from oven and while cake is cooling prepare the apricot glaze.

15.  Place the jam in a saucepan and add the water, stir over medium heat until the jam melts and begins to bubble.

16.  Using a pastry brush (or spoon), spread the glaze over the top of the cake.  Cut into squares and marvel in the apple-y goodness!

I’m so excited…

Standard

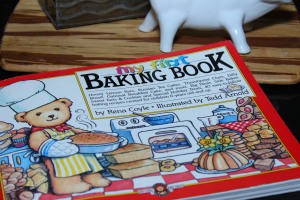
And I just can’t hide it…Ok, enough of that.  I am pretty excited today though – look what came in the mail!

My first baking book

I was doing some digging on the interwebs to see if the author of the My First Cookbook was still writing.  And although she’s not (or that I could find anyway), I did discover that she made a second book called My First Baking Book a few years later.  I skimmed through the recipes and they sound just as amazing (if not more!)  So now my quest carries on!  I don’t know if I can wait till the end of the year to finish the other one and then start on this one, so there might be a smattering of both all year 🙂  Can you sense my excitement?!?

Cheers everyone!

(Not quite) Teddy Bear Chocolate Chip Cookies

Standard
(Not quite) Teddy Bear Chocolate Chip Cookies

I take pride in my chocolate chip cookies.  I have a tried and true recipe I’ve been using for years and have “perfected”.  But, I’m allowing this blogging experience to take me out of my culinary box, so I gave this recipe a go.  Plus, I thought my kid would get a kick out of teddy bear shaped cookies, and I figured, how hard could that be?  Man was I wrong… the day will go down in history as the “Amorphous Blob Cookie Disaster of 2013”.  I dried my chocolate stained tears and sheepishly reached for my cookie dough scoop.

The flavor of the cookie is actually really good.  Definitely a more crisp, versus chewy cookie.  Worth a try in my opinion – and maybe you’ll have better luck with attempting a shape (and if you do have success and would like to rub salt into my wound and post it here, I’ll understand…)  Good news is, a chocolate chip cookie is never a bad thing to have around, no matter what it looks like!

chocolate chip cookie

The Recipe:

2 1/2 cups all-purpose flour

1/2 teaspoon baking soda

1 cup (2 sticks) butter, at room temperature

1/4 cup vegetable shortening

1/2 cup granulated sugar

1/3 cup packed dark brown sugar

1 egg

1 teaspoon vanilla

2 cups semisweet chocolate chips

1 cup chopped walnuts (optional)

The Process:

1.  Preheat oven to 350 F.

2.  Place the flour and baking soda in a bowl and mix.

3.  Place the butter, shortening, and sugars in a separate mixing bowl and beat for 2 minutes until combined.  Scrape the sides of the bowl and continue to mix for another 2 minutes until light and fluffy.

4.  Break the egg into the bowl and add the vanilla.  Mix at medium speed for about 1 minute.

5.  Add about half the flour mixture and blend at low speed until incorporated.  Add the remaining flour mixture and mix until well blended.

6.  Add the chocolate chips and walnuts and mix at lowest speed until evenly distributed in the batter.

7.  Attempt to make teddy bear shapes… or give up and spoon tablespoons of dough onto a cookie sheet.

8.  Bake at 350 F for about 10-12 minutes or until edges begin to turn golden brown.

9.  Remove and let cool slightly before transferring to a cooling rack.

Cheater Chili

Standard
Cheater Chili

We’re not huge chili eaters around here.  So I wasn’t super excited when I came across the recipe in the book.  But then, I had a moment of inspiration…what if I used the left over Mini-Meatloafs as the base?  That would save me some cooking time, and use left overs that always get forgotten in the depths of the fridge.  Genius? Maybe, maybe not.  But hey, we ate chili, and it was pretty darn tasty 🙂

Chili

The Recipe (makes 6 servings):

1 medium bell pepper (any color will do)

1 small onion

1 pound lean ground beef (or left over Mini-Meatloafs!)

1 can (14 1/2 oz.) crushed tomatoes

1 can (19 oz.) kidney beans (I actually left these out of my chili)

2 tablespoons chili powder

1 tablespoon ground cumin (Cumin and I do not get along, I can’t stand the smell, so omitted this too!) 🙂

1/2 teaspoon garlic powder

1 cup tomato puree

1/2 teaspoon salt

4 oz. Sharp Cheddar, grated

1 container sour cream

Green onions for garnish, optional


The Process:

1.  Chop the bell peppers and onions.  Saute in a sauce pan until tender.

2.  Add the ground beef (or Mini Meatloafs!) to the pan and cook over medium heat until no pink remains.

3.  Empty the can of crushed tomatoes into the pan and stir.

4.  Strain and rinse the kidney beans and add to pan.

5.  Add the chili powder, cumin (yuck), garlic powder, tomato puree and salt to the meat mixture.  Simmer over low heat for 20 minutes, stirring occasionally.

6.  While the chili is cooking, shred the cheddar (don’t scrape your knuckles!).

7.  When the chili is ready, ladle into bowls and top with grated cheddar, a dollop of sour cream, and green onions if you choose.

It may be cheating, but cheating can be yummy 🙂

Classic Fudge Brownies (with a Peanut Butter twist)

Standard

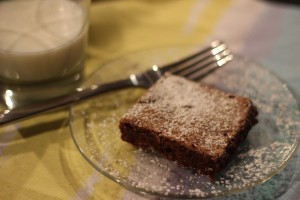
Here’s your pretty standard fudgy brownie recipe.  I added a little “me” twist by swirling in some yummy peanut butter – just to make them that much more awesome.

Fudge peanut butter Brownie


The Recipe

4 oz. unsweetened baking chocolate (I used semi-sweet chocolate chips since I had them on hand)

1/2 cup (1 stick) butter

1 1/2 teaspoons butter at room temperature

3 eggs

1  1/2 cup sugar

1 teaspoon vanilla (as per usual, I did 2 teaspoons)

1 cup all-purpose flour

1/4 cup melted peanut butter (optional)

1 cup chopped walnuts (optional)


The Process

1.  Preheat oven to 325 F

2.  Using a double boiler, melt the 1/2 cup butter and chocolate over low heat.  Stir occasionally.  Set aside to cool when completely melted.

3.  Butter the bottom and sides of a 9×12 baking dish.

4.  Break the eggs into the bowl of your mixer.  Add the sugar and vanilla and beat until light and fluffy (around 2 minutes).

5.  Add the cooled chocolate mixture and mix at low speed until incorporated into the sugar mixture.   Add half the flour and mix at low speed until mixed in.  Add the remaining flour (and optional walnuts) and mix until blended.

6.  Pour the batter into the buttered baking dish.  If using the peanut butter option, melt 1/4 cup of peanut butter in the microwave.  Place a dollop of peanut butter at each corner of the pan and 1 dollop in the center.   Using a knife, swirl the peanut butter in an “S” shape from top to bottom, and then side to side.  The tops of these brownies turn out a little light, so the pretty peanut butter swirls got a little lost unfortunately.  But they still tasted amazing!

7.  Place in oven and bake for approximately 25-30 minutes.

8.  If you can…allow the brownies to cool for 15 minutes before diving in.

Choco-holics unite! 

Mini Meatloaf (aka Meat Muffin, aka Meat Cupcake)

Standard
Mini Meatloaf (aka Meat Muffin, aka Meat Cupcake)

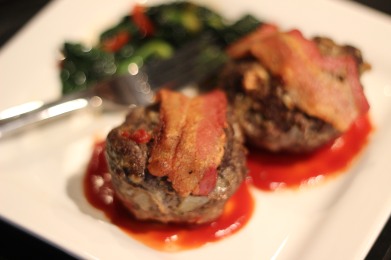
Call it what you will, but let’s be honest – it’s a meatball. 🙂  But a darn good meatball!  I followed the recipe almost to a “T”, and it turned out amazing.  The only suggestion I didn’t take was to turn the “meat muffin” upside down when serving so the bacon is on the bottom.  Who in their right mind would hide bacon?!?

*Pro Tip: Place your muffin tin in a dish with higher sides to catch the drippings.  I’ll be cleaning my oven if anyone needs me…sigh…

Personal Mini Meatloaf

The Recipe

2 Tablespoons butter (or cooking spray)

1 medium onion

1 1/2 pounds ground beef

1/4 cup bread crumbs (I used Italian seasoned)

1/2 Teaspoon garlic powder

1/2 Teaspoon salt

1/4 Teaspoon pepper

1 egg

Ketchup

3 slices of bacon, cut into thirds

The Process

1. Preheat oven to 350 F

2.  Lightly butter a muffin tin (or spray lightly with cooking spray)

3.  Finely chop onion.

4.  Place meat in large working bowl.  Add in chopped onion, bread crumbs, garlic powder, salt and pepper.  Break egg into bowl and mix all ingredients by hand until incorporated.

5.  Spoon 1 tablespoon of ketchup into each muffin tin (The recipe calls for 6 meat muffins, I ended up with 7).

6.  Divide the meat mixture evenly into muffin cups (the book kindly reminds us to wash our hands after this step, so don’t forget!)

7.  Place 1 strip of the cut bacon over each meatloaf.

8.  Place the muffin tin on your preferred baking dish (to catch drippings – don’t be like me!!)

9.  Bake at 350 F for 25 minutes.

10.  Remove from oven and serve bacon side up (don’t listen to them and hide the bacon!) Serve alongside your favorite veggies (we had some kale hanging around that was dying to be sauteed).

Mmmm….soft pretzels….

Standard

Who on this planet doesn’t love a good soft pretzel?  Especially a home-made one, fresh out of the oven?!? Now I’m hungry…but I’ll press on.  I made these Rosemary Sea Salt Pretzels a few months ago, and they were A-mazing.  So I thought I’d share the recipe.  Did I mention they also include the recipe for an awesome rosemary cheese sauce?  Oh yeah, no joke.

rosemary sea salt pretzel

And then today, I came across these and I just had to pass it along – Chocolate Chip Brioche Pretzels.  Sweet meets pretzel = my heaven!   Guess I know what I’m baking this weekend…

Rainy Day Cinnamon Raisin (Walnut) Bread

Standard
Rainy Day Cinnamon Raisin (Walnut) Bread

It’s an awesome cloudy, semi-rainy day here in Phoenix.  We don’t get many, so I figured I’d take up mother nature and make some yummy Cinnamon Raisin Bread.  I’ll be honest – my ten year old self would have never attempted this recipe.  Holy prep-time Batman!  The dough has to rise a total of 3 times, but totally worth it – my 3 year old (and husband) couldn’t get enough 🙂
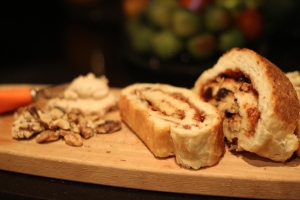
Cinnamon raisin walnut bread

The Recipe

2 cups milk

1 package active dry yeast

5 to 6 cups all-purpose flour

3/4 cup sugar

2 teaspoons salt

1/2 butter at room temperature

1 tablespoon oil

2 teaspoons ground cinnamon

1/4 cup raisins

1/4 cup chopped walnuts (I added these to the recipe, well worth it!)

The (lengthy) Process:

1.  Pour the milk into the saucepan and place on the stove.  Heat milk over medium heat until it steams and bubbles form around the edge.  Let cool for 10 minutes.

2.  Place the yeast, 5 cups flour, 1/2 cup sugar, and salt into a large mixing bowl and mix.  Add 2 tablespoons of the butter and the cooled milk. Stir until a stiff dough forms.  Add in additional flour if needed.

3.  Flour a clean work surface.  Remove the dough and place on floured surface, sprinkle a little additional flour on top.

4.  Knead the dough for about 5 minutes, and then form into a ball.  The book goes into a length description about kneading, again, I’m going to assume we’re all adults here, if we’re not, here’s a great tutorial 😉

5.  Pour the oil into a large mixing bowl and spread around with a paper towel.  Place dough in the bowl and turn once to coat in oil.  Cover the bowl with a kitchen towel and place in a warm spot.  Allow dough to rise for about 1 hour, or until it doubles in size)

6.  Remove the dough from the bowl and punch down.  Shape back into a ball and allow to rise (yet again) for 30 minutes.

7.  Rub some butter into the bottom and sides of 2 loaf pans (about 4″x 8″).

8.  Place 4 tablespoons of the butter,  the remaining 1/4 cup of sugar, and the 2 teaspoons of cinnamon into a small mixing bowl and combine.  Takes a little effort, but it eventually comes together.

9.  When the dough has risen for the second time, sprinkle a clean surface with flour and move the dough to the surface.  Using your hands, flatten dough into a rectangle as thin as you can get it.

10.  Spread the butter mixture onto the dough, and then sprinkle with the raisins and walnuts (if using).

11.  Starting along one edge, roll the dough as tightly as you can (should make a very pretty spiral in the center).  Cut the dough in half to make 2 loafs and place seam-side down in the buttered pans.  Cover with the kitchen towel and (you guessed it) let the loaves rise for (another) 30 minutes.  In the meantime, preheat the oven to 350 F.

12.  Spread the remaining 1 tablespoon of butter onto each loaf.  Place on the center rack in the oven and bake for about 35 minutes.  They give a great tip and say to bake until the bread sounds hollow when you lightly tap on it.

13.  Remove bread (don’t forget the mitts!!) and tip each loaf over to allow it to slide out of the pan.  Cool on a wire rack.

They suggested serving thick slices with cream cheese – but I though, why not take that a step further?  Enter…cinnamon cream cheese…oh yeah.  Seriously, you have to try it.

Cinnamon Cream Cheese

I package softened cream cheese

1 teaspoon cinnamon (or more to taste)

2-3 teaspoons brown sugar

Best rainy day ever!
Let’s just start with my favorite – for science, right?

Standard
Let’s just start with my favorite – for science, right?

I can vividly remember making these Cinnamon Honey Scones in my grandmother’s kitchen when I was a kid.  The best part of the recipe to a 30-something year old – oops I mean 10 year old?  You get to squish the butter into the flour by hand.

Cinnamon Honey Scone

The Recipe:

1 -3/4 cups all-purpose flour

1- 1/2 teaspoons baking powder

1/4 teaspoon cinnamon (I usually do close to 1/2)

6 tablespoons butter (the recipe calls for the butter to be room temp. but I’ve found that cold butter makes for a fluffier, crispier end result)

1 tablespoon honey (I do closer to 2 for a little more added sweetness)

1/2 cup milk (or more as needed)

1 egg

The Process:

1.  Heat the oven to 400 F.

2.  Line a cookie sheet with parchment or a silpat.

3.  Stir the flour, baking powder, and cinnamon together in a bowl.

4.  Add the cold butter to the flour mixture and work with your hands (he he!)  until the butter somewhat crumbles.

5.  Add the honey, milk and egg. Stir until well incorporated.

6.  Using a spoon, drop the dough by spoonfuls onto the cookie sheet.  Leave a little room between the scones.

7.  Place in oven for 12-15 minutes or until slightly golden on top.

8.  Remove from oven (the book is good at reminding you to use your oven mitts, but we’re  all adults here, right?) and let stand a couple minutes before serving.

Serve warm with butter and lots of extra honey for smothering.  Tea party it up people!